

Siege Media’s Jen Pedrozo shares the way to arrange photo voltaic panels for tenting with out spending a fortune.
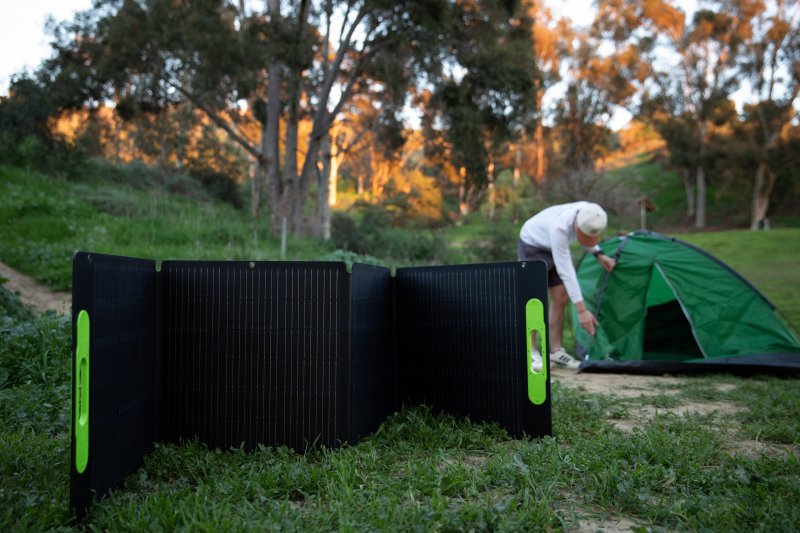
A part of the attraction of tenting is getting away from all of it. Sadly, that additionally means dropping entry to on a regular basis comforts like electrical energy. You may all the time hook as much as a generator to run electrical energy for any lights or home equipment you will have at your campsite or camper, however these aren’t environmentally pleasant and may pose a fireplace threat. Luckily, photo voltaic panels for tenting are an incredible supply of power.
Photo voltaic panels have turn out to be extra in style amongst campers, however buying a equipment can get expensive. As a substitute, decide to make your individual photo voltaic panel. Learn on to study extra about utilizing photo voltaic panels if you camp and the way to make your individual.
The Advantages of Utilizing Photo voltaic Panels Whereas Tenting
Photo voltaic panels for tenting are a good way to energy your campsite whereas following the tenting adage of leaving no hint. Organising a photo voltaic panel system at your campsite has the next advantages:
- Photo voltaic power is clear. As soon as assembled, photo voltaic panels don’t have any destructive environmental impacts. Not like gasoline mills, they don’t burn fossil fuels or launch poisonous byproducts into the air. Maybe most significantly for campers, photo voltaic power is totally silent, so you’ll be able to benefit from the sounds of nature relatively than the roar of your generator’s engine.
- Photo voltaic power is free. As soon as you purchase the photo voltaic panel and the battery to retailer energy, you received’t should pay one other cent for photo voltaic power. With a generator, you’d should preserve buying gasoline on your generator or paying hookup and utilization charges for a campsite with electrical energy hookups.
- Photo voltaic power is simple to arrange. Utilizing photo voltaic power is simple: simply put the photo voltaic panel in a spot that will get solar and join it to your battery for storage.
- Photo voltaic power is transportable. Wherever there may be solar, you’ll be able to have energy with a photo voltaic panel. Wish to camp beachside? No drawback. Desire the wilderness within the mountains? Do it. Not like a generator, you’ll by no means have to depart your campsite to restock your gas because the solar by no means runs out of power.
- Photo voltaic power is simple to keep up. All that you must do to maintain your photo voltaic power system working is clear your photo voltaic panel sometimes. No tune-ups or different upkeep required like with a generator.
How To Use Photo voltaic Panels Whereas Tenting
Earlier than you decide to utilizing photo voltaic at your campsite, that you must think about your wants.
- How do you propose to make use of your photo voltaic panel at your campsite? Are you simply making an attempt to maintain your cellular phone charged, or will you be powering a projector for film night time in nature? How a lot power you want determines what dimension photo voltaic panel you’ll want.
- The place will you set the photo voltaic panel? Search for an area in your campsite that will get essentially the most solar in the course of the day. Whereas a photo voltaic panel can nonetheless generate power in partial daylight, it received’t produce as a lot as within the solar. Earlier than you head to your campsite, analysis the quantity of solar it receives and test the climate forecast.
- When will you want the power out of your photo voltaic panel? Will you simply want it in the course of the day, or will you utilize it to energy lights at your campsite? In case you plan on utilizing the power at night time, you’ll wish to put money into a big sufficient battery to retailer the power for when wanted.
As soon as you buy (or make your individual) photo voltaic panels, all you’ll have to do at your campsite is place the photo voltaic panels the place they’ll get essentially the most solar and join it to your battery storage. You may even mount them on the roof of your campervan or RV in order that they’re all the time harnessing power.
How To Make Your Personal Photo voltaic Panel for Your Campsite
Whereas you should buy photo voltaic panel methods for tenting, you’ll be able to construct one your self you probably have the appropriate instruments and know-how. When you have the instruments at your campsite, you’ll be able to assemble your photo voltaic panel there, or create it at residence earlier than you permit.
Step 1: Collect the required elements and instruments
The very first thing that you must do is buy the required elements and collect all of the instruments you want for the job. Purchase your photo voltaic cells first, as the dimensions of your cells will decide what dimension panel that you must construct.
Mandatory elements for the photo voltaic panel itself embody:
- Photo voltaic cells
- A sheet of plexiglass
- 4 1x2s
- A backing board (Select one thing non-conducive, like wooden, cardboard, glass, or plastic. Wooden is most popular because it’s simpler to chop and sturdier than the opposite choices.)
- A roll of tabbing wire
- A roll of solder
- A tube of silicone adhesive
- Bus wire
For the battery system, you’ll want the next:
- A diode
- A terminal block
- A cost controller
- A battery
You’ll additionally want the next instruments:
- Soldering iron
- A flux pen
- Wire cutters
- A noticed
- Deck screws
- Butt joints
- Screw gun/screwdriver

Step 2: Create the backing board
Lay your photo voltaic cells on the backing board in as few rows as attainable however don’t connect them to the board but. There ought to be a small house between every cell.
Measure a further two inches of house past the ends of your rows, above the highest row, and beneath the underside row. That’s how giant your backing board ought to be.
Reduce the board to the dimensions you measured.
Step 3: Reduce your tabbing wire and join it to the photo voltaic cells
Your tabbing wire connects every photo voltaic cell to a different. Reduce the wire to lengths twice the dimensions of the contract pads on the photo voltaic cells. You’ll want two of those per cell.
Use a flux pen to flux the trail of the wire to forestall oxidation whilst you solder the wire to the cells. Then use your solder iron and solder to attach two items of tabbing wire to every cell. Half of every wire ought to lengthen from one aspect of the cell. You’ll use that later to attach the cell to the following one.

Step 4: Join your photo voltaic cells
Use a dot of silicone adhesive to attach the again of your photo voltaic cells to the backing board. Preserve the tabbing wire straight to attach all of the cells within the row.
Every row ought to alternate wiring instructions. So if the wires within the first row join a cell to the one to the appropriate of it, then wires within the subsequent row ought to join every cell to the one to the left of it.
Then solder the ends of the tabbing wire to leads on the highest of the following photo voltaic cell. Bear in mind to make use of the flux pen to prep the world earlier than soldering.
Solder tabbing wire to the leads on high of the primary photo voltaic cell in your row so it factors off the board. Join these two items of tabbing wire to bus wire that’s an inch longer than the house between contact pads on the cells. That is the optimistic finish of your photo voltaic panel.
On the finish of the row, connect an extended piece of bus wire to attach the studying wire of the primary row with the tabbing wire within the row beneath it. Add two items of extra tabbing wire to the final cell on this row, and join it to the row beneath it with bus wire. Repeat as wanted till all of the wires are related.
The final photo voltaic panel within the final row ought to join to a different quick piece of bus wire, similar to the optimistic finish. That is the destructive finish of your photo voltaic panel.
Step 4: Assemble the panel field
You’ll have to create the panel field to guard all of the cells you simply wired collectively from the weather.
Measure and reduce your 1×2 planks to suit the backing board. Utilizing deck screws, butt joints, and a screw gun, connect the reduce 1x2s to one another to assemble a body.
Drill holes within the 1x2s the place you will have the 2 shorter items of bus wire. The holes ought to be barely bigger than the diameter of the bus wire.
Lastly, glue the backing board to the completed field. Watch out to not disturb any of the cells or different elements.
Step 5: Wire your panel
As soon as the field is constructed, it’s time to assemble the wiring so the power from the photo voltaic panels can be utilized.
Begin by connecting your panel to a diode, which directs the present from the photo voltaic panel to the battery. You’ll have to solder one finish of a wire to the bus wire on the destructive finish of your photo voltaic panel and join the opposite finish of the diode.
Solder one other wire (use a unique shade) to the bus wire on the optimistic finish of your photo voltaic panel.
Set up a terminal block to the aspect of your photo voltaic panel field. Run each wires out of your photo voltaic panel’s optimistic and destructive ends by way of the terminal block.
Join your terminal block to a cost controller to manage {the electrical} present to forestall overcharging your battery.
Lastly, join the cost controller to your battery.
Step 6: Seal the panel field
Glue 1×1 blocks in every nook of the panel field. Watch out to not disturb any of the photo voltaic cells.
Reduce a sheet of plexiglass to the dimensions of your photo voltaic panel field. Then place the plexiglass sheet on the 4 blocks. Screw the plexiglass to the blocks. Seal the sides of the plexiglass to the partitions of the photo voltaic panel with a silicone sealant.
You’re prepared to start out harnessing photo voltaic power to energy your campsite!
Now take a look at Solartap’s full infographic to study extra about constructing your individual photo voltaic panel.
Have you ever arrange Photo voltaic Panels for Tenting?
If not, have you considered making an attempt this on your subsequent journey? Maybe you might be skilled with photo voltaic panels and their use within the nice outdoor. Please do share your ideas beneath.